Thursday, 17 March 2016

Cryptographic Key Error

Part of Cognos configuration is the length of time the encryption key will stay valid. If the encryption key expires, the Cognos administrator needs to regenerate the key in EVERY instance/installation. The setting can be found here:


To regenerate the encryption keys, follow these instructions, which can be found from this link as well:
http://www-01.ibm.com/support/docview.wss?uid=swg21383421
Steps to Regenerate Cryptographic Keys
1. Stop the Cognos services.
2. On the Content Manager computer, back up the existing cryptographic keys by saving the
following directories to an alternate location that is secure:
● c10_location/configuration/csk
● c10_location/configuration/encryptkeypair
● c10_location/configuration/signkeypair
3. Open Cognos Configuration, go to the File menu and select Export As, click yes at the prompt and save the file as backup.xml in the c10_location/configuration folder.
4. Delete the csk, encryptkeypair, and signkeypair directories.
5. In the c10_location/configuration folder, rename the existing cogstartup.xml to cogstartup.old
6. In the c10_location/configuration folder, rename backup.xml to cogstartup.xml.
7. Open Cognos Configuration, save the configuration and restart the services.
8. Repeat steps 1 to 7 on all computers that have Cognos components installed.
I however encountered an error when I was about to export the file (step #3). Fortunately, Cognos periodically saves cogstartup.xml file in \configuration
I renamed (backup) the current cogstartup.xml, and replaced with the latest cogstartup that Cognos saved. The error that I encountered in step #3 went away.
Some configuration settings however changed. Fortunately, I was able to save a screenshot of all the configuration values while the server was still up and running. That is also a very good tip, the moment you get access to Cognos server configuration, take a screen shot of all the values.

Create Half Year Level

When Cognos Transformer generates the Time Dimension, it does not have a Half Year Level. To add a half year level in your cube follow the following steps:
1. Generate the Time Dimension
2. Insert Half Year level above Quarter
half_year
3. Generate categories
4. Click Show Diagram. You will see that from Year level, the data directly links to Quarter level
time_categories
5. Click on a Year and drag and drop the line to Half Year column. Fill up the category information with Half year label and code.
6.Link the associated Quarters with the Half Year value by clicking on the Half Year value and dragging and dropping the line to the Quarter value.
half_to_quarter
Keep in mind that if you do a full clean house, the Half Year member you created will be erased and you have to add them again manually.

Cube Refresh Report

I was asked to create a report that will show the refresh times of three cubes. The first thing I thought was three different reports displayed in a tab. The task however can be accomplished with one report only.
To do this, you must import the data source connection of the cubes in your FM package. Use the usual “Run Metadata Wizard” and select the Cube data source.

After successfully importing the cube data source, the icon looks like the one above. Publish the package and use normally.

Refresh Transformer Cube from UNIX

So I was able to successfully made my cubes refresh from UNIX. Here are the steps:
First, set the processing option to “On the server”. This can be found in the Processing tab of the cube properties:
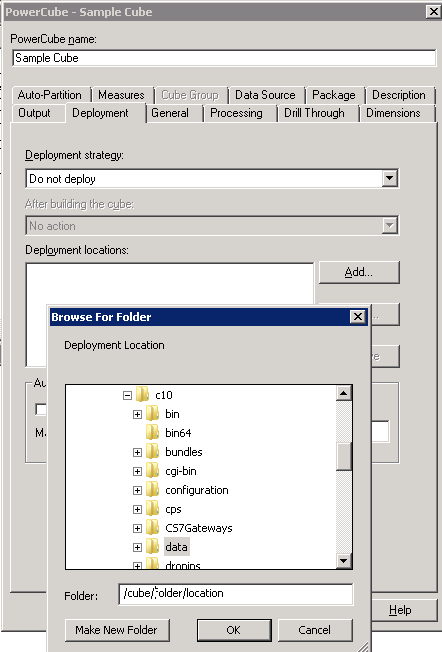
Next change the deployment folder. Use UNIX syntax. Note that Transformer will not be able to verify the folder that is specified so it is important that the correct directory path is given.


Almost there. The command line should be edited to that which is compatible with UNIX. Here is the syntax I used based on the cube from the previous post:
./cogtr -c -lS1=’admin/admin123′ -g’My Cube’ -m’/cube/location/in/unix/mycube.mdl’
A few reminders:
1. avoid using cube names or deployment folders with spaces
2. avoid using uppercase in cube or folder names as well as UNIX is case sensitive
I have not discovered how to properly set the location of the log files so I redirect the output to a file to save my logs:
./cogtr -c -lS1=’admin/admin123′ -g’My Cube’ -m’/cube/location/in/unix/mycube.mdl’ >> /logfolder/mycube.log

Monday, 14 March 2016

Refresh Transformer Cube from Windows Command Line

I would like to record the things I remember about refreshing cubes using Windows command line parameters before I forget about them. Here are the things and tips I remember.
First, open your cube from Cognos Transformer. Determine dimension(s) wherein the lowest levels might have duplicates during refresh. Right click on the lowest level and tick the “Move” option. This will prevent the process from terminating once a duplicate is encountered.

lowest_level
Next make sure you only have one cube defined. More specifically, remove the unneeded cubes as they would also be refreshed automatically, adding to your refresh time.

cube
Make sure you set the deployment parameters properly.
deployment
Create a singon for security. Give the correct username and password. Remember the name of the signon as it will be used in the command line. In the sample image below, the name of my signon is S1.

signon
At this point you are almost ready to create the command line script. Go to the machine from where you intend to run the script. Ideally, it is the same machine where Transformer and Framework Manager is installed. This is to make sure that the proper configuration is already in place.
From here on, basic knowledge of DOS is required. Locate the Cognos installation folder, it should contain the bin directory which in turn contains the cogtr.exe file. In your script it is advisable to run the CD command to this folder (although this is not necessary if you can set the search path, etc, that is if you are really good at DOS). For example:
cd \Program Files\ibm\cognos\cognos10\bin
Next run the cogtr.exe with the following options:
cogtr.exe -c -n2 -lS1=”admin/admin123″ -g”My Cube” -m”c:\cognos\cube\location\mycube.mdl”
You can use other options as necessary. Here is a simple explanations on the sample options I used:
-c = This option loads a model file, interprets MDL statements, generates categories, and creates cubes.
-n2 = opens Transformer in batch mode with the Transformer application window hidden. There is no space between -n and the display_state argument, 2.
-lS1 = “admin/admin123″ = uses the signon “S1″ as specified above. admin/admin123 is the login name and password
-g”My Cube” = deploys “My Cube” as created above
-m”c:\cognos\cube\location\mycube.mdl” = location of your cube.

Detect Disappearing Member

Recently I have a requirement to create a report where we need to display either “List Before” or “List After” depending on information status for the month. Upon further checking I realized the information status can be determined depending on whether a member (Before) is present or not in a dimension:

after
Presence of “Before” member means to display “List Before”

before
Later part of the month, member “Before” will disappear and the report should display “List After”

I added the Flag level in the Query, then added a calculation to count how many members are present:

count
Then I added a string variable (BeforeOrAfter) to set a value depending on how many members the level returned. If the level returned three members (‘NA’,’BEFORE’ and ‘AFTER’), the variable will return the value “0″. If the level do not have “BEFORE”, it will return only two members (‘NA’ and ‘AFTER’) and the string variable will return the value “1″.

var

Then I set the BeforeOrAfter as the render variable of my lists. “List Before” will render when BeforeOrAfter = 0 and “List After” will render when BeforeOrAfter = 1.

beforelist
afterlist

When I run my sample report, I get the correct list as the information status for the month is currently “After” .

outputafter
To try to simulate when “BEFORE” member is present, I change the string variable to:

BeforeOrAfter =if([Query1].[Count Flag] > 1) then (’0′) else (’1′)

Go figure it out :)
I get this output:

outputbefore

Triggers

Not much documentation can be found about triggers. However we were able to successfully make it run on a Windows machine. We use this machine to create and publish Framework Manager models to our Cognos Server. Somehow Java is also included when FM was installed.
First thing we did is to copy these jar files to a folder in the Windows machine:
jarfiles
Let us call that folder c:\trigger\jar\lib
These jar files can be found in one of the the Cognos Server installation folders. In our case the exact folder is:
<Cognos installation folder>\webapps\p2pd\WEB-INF\lib
Next we copied these triggers files in another folder (let us call it c:\trigger\runtrigger)
triggerfiles
I would like to mention that I did not find these files in our current Cognos Server installation folder. I however looked in other installation folders in our production and development environment. Anyway these files can usually be found in
<Cognos installation folder>\webapps\utilities\trigger
 Now we need to know where is the Java folder in our Windows machine. I said earlier that Java is installed together with Framework Manager.  I found it in:
<Cognos installation folder>\bin\jre\6.0
If you don’t have Java in the machine you intend to use, you can install it manually. In any case you need to know which folder is your Java installed as you need to set the JAVA_HOME variable value to that folder.
So we edit the trigger.bat file mentioned above to look something like this:
triggerbat
To manually run trigger.bat, open the command prompt window, then navigate to the folder where it is located in the command prompt:
cd c:\trigger\runtrigger
This is how to run trigger.bat:
trigger “http://<server ip address>:9400/p2pd/servlet/dispatch” “<cognos admin login>” “<password>” “<LDAP name>” “<trigger name>”
where
<server ip address> is the ip address or url of your Cognos server (example: 10.20.30.123)
<cognos admin login> is the login id of Cognos Administrator (or any user with enough admin rights)
<password> the password of <cognos admin login>
<LDAP name> is the name of the Namespace ID which can be found in Cognos Configuration
ldap
and <trigger name> is the name you give to your trigger.